9.9 KiB
Object Detection
Object Detection task with YOLOv5 model.This document contains the explanations of arguments of each script.
You can find the tutorial document for finetuning a pretrained model on COCO128 dataset under the tutorial folder, tutorial/README.md.
The ipython notebook tutorial is also prepared under the tutorial folder as tutorial/tutorial.ipynb. You may upload and run this ipython notebook on Google colab.
Prerequisites
- Python 3.8 or above
Installation
$ pip install -U pip
$ pip install -r requirements.txt
Dataset & Preparation
The image data, annotations and dataset.yaml are required.
MS COCO
Our traning script accepts MS COCO dataset. You may download the dataset using the following link:
- Download 2017 MS COCO Dataset
Custom Datasets
You can also train the model on a custom dataset.
Annotations Format
After using a tool like CVAT, makesense.ai or Labelbox to label your images, export your labels to YOLO format, with one *.txt file per image (if no objects in image, no *.txt file is required). The *.txt file specifications are:
- One row per object
- Each row is
class x_center y_center width heightformat. - Box coordinates must be in normalized xywh format (from 0 - 1). If your boxes are in pixels, divide
x_centerandwidthby imagewidth, andy_centerandheightby image height. - Class numbers are zero-indexed (start from 0).
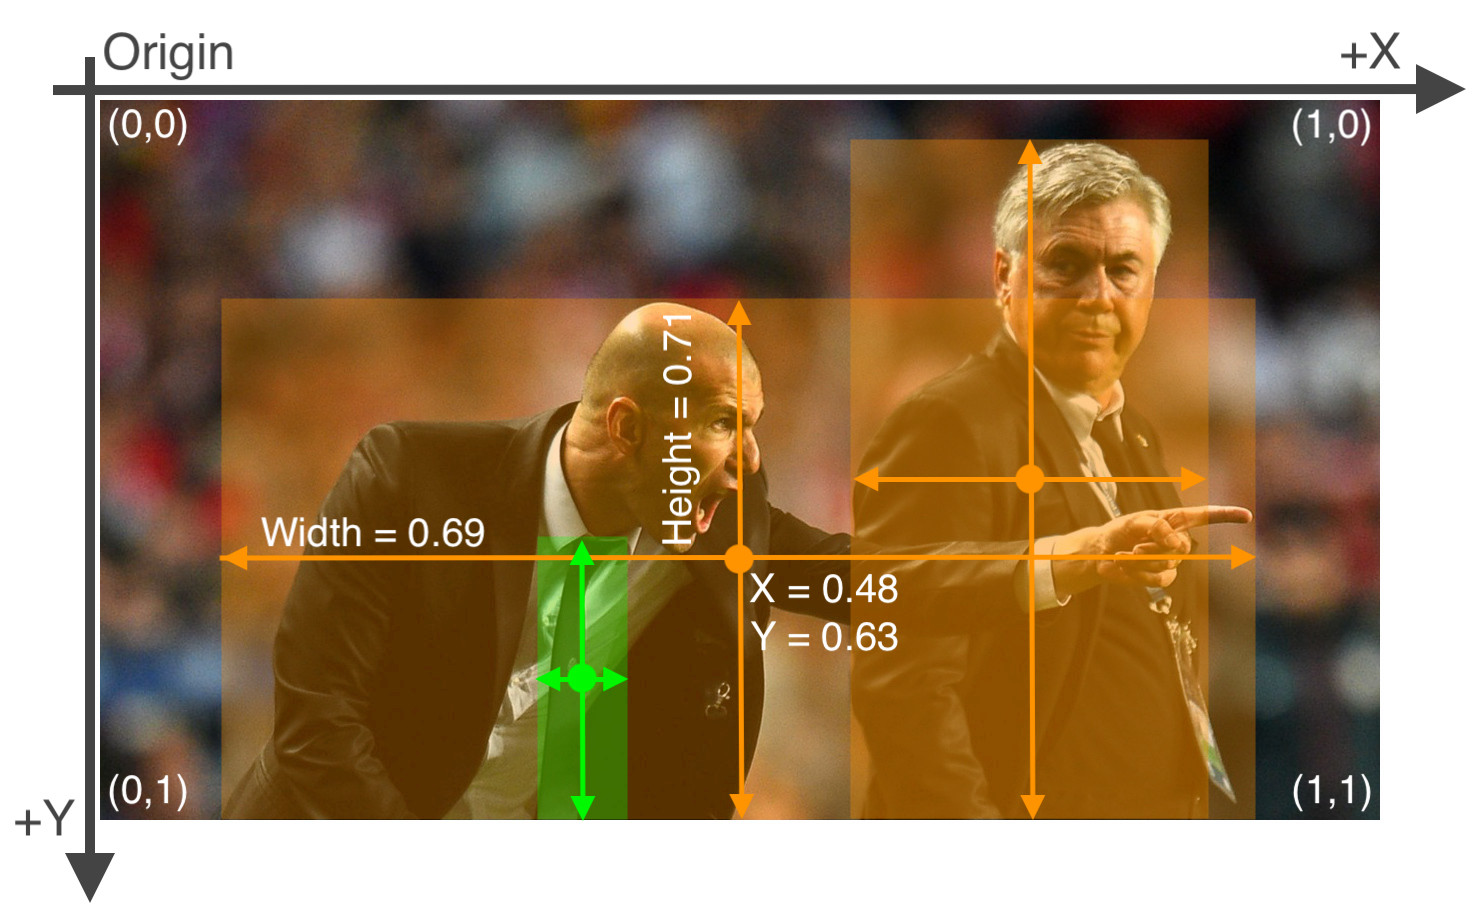
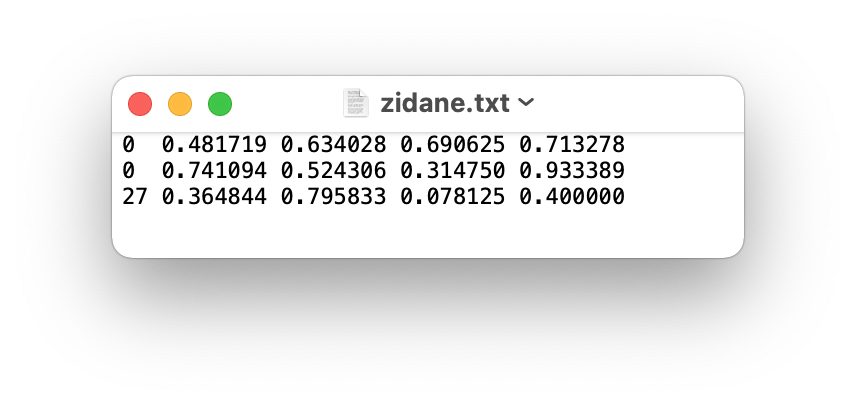
The label file corresponding to the above image contains 2 persons (class 0) and a tie (class 27):
Directory Organization
Your own datasets are expected to have the following structure. We assume /dataset is next to the /yolov5 directory. YOLOv5 locates labels automatically for each image by replacing the last instance of /images/ in each image path with /labels/.
- Dataset name
    -- images
        -- train
            --- img001.jpg
            --- ...
        -- val
            --- img002.jpg
            --- ...

    -- labels
        -- train
            --- img001.txt
            --- ...
        -- val
            --- img002.txt
            --- ...

- yolov5

- generate_npy

- exporting
dataset.yaml
The yaml file for COCO dataset has been prepared in ./data/coco.yaml. For custom dataset, you need to prepare the yaml file and save it under ./data/. The yaml file is expected to have the following format:
# train and val datasets (image directory or *.txt file with image paths)
train: ./datasets/images/train/
val: ./datasets/images/val/

# number of classes
nc: number of classes

# class names
names: list of class names
Train
For training on MS COCO, execute commands in the folder yolov5:
CUDA_VISIBLE_DEVICES='0' python train.py --data coco.yaml --cfg yolov5s-noupsample.yaml --weights '' --batch-size 64
CUDA_VISIBLE_DEVICES='0' indicates the gpu ids.
--data the yaml file. (located under ./data/)
--cfg the model configuration. (located under ./model/) (yolov5s-noupsample.yaml for 520, yolov5s.yaml for 720)
--hyp the path to hyperparameters file. (located under ./data/)
--weights the path to pretained model weights. ('' if train from scratch)
--epochs the number of epochs to train. (Default: 300)
--batch-size batch size. (Default: 16)
--img-size the input size of the model. (Default: (640, 640))
--workers the maximum number of dataloader workers. (Default: 8)
By default, the trained models are saved under ./runs/train/.
Generating .npy for different model input
We can generating .npy for different model input by using yolov5_generate_npy.py. Execute commands in the folder generate_npy:
python yolov5_generate_npy.py --input-h 640 --input-w 640
--input-h the input height. (Default: 640)
--input-w the input width. (Default: 640)
We could get *.npy
Configure the paths yaml file
You are expected to create a yaml file which stores all the paths related to the trained models. This yaml file will be used in the following sections. You can check and modify the pretrained_paths_520.yaml and pretrained_paths_720.yaml under /yolov5/data/. The yaml file is expected to contain the following information:
grid_dir: path_to_npy_file_directory
grid20_path: path_to_grid20_npy_file
grid40_path: path_to_grid40_npy_file
grid80_path: path_to_grid80_npy_file

yolov5_dir: path_to_yolov5_directory
path: path_to_pretrained_yolov5_model_weights_pt_file
yaml_path: path_to_the_model_configuration_yaml_file
pt_path: path_to_export_yolov5_model_weights_kneron_supported_file
onnx_export_file: path_to_export_yolov5_onnx_model_file

input_w: model_input_weight
input_h: model_input_height

nc: number_of_classes

names: list_of_class_names
Save and Convert to ONNX
This section will introduce how to save the trained model for pytorch1.4 supported format and convert to ONNX.
Exporting ONNX model in the PyTorch 1.7 environment
We can convert the model to onnx by using yolov5_export.py. Execute commands in the folder yolov5:
python ../exporting/yolov5_export.py --data path_to_pretrained_path_yaml_file
--data the path to pretrained model paths yaml file (Default: ../yolov5/data/pretrained_paths_520.yaml)
We could get onnx model.
Converting onnx by tool chain
Pull the latest ONNX converter from github. You may read the latest document from Github for converting ONNX model. Execute commands in the folder ONNX_Convertor/optimizer_scripts:
(reference: https://github.com/kneron/ONNX_Convertor/tree/master/optimizer_scripts)
python -m onnxsim input_onnx_model output_onnx_model

python pytorch2onnx.py input.pth output.onnx
We could get converted onnx model.
Inference
Before model inference, we assume that the model has been converted to onnx model as in the previous section (even if only inference pth model). Create a yaml file containing the path information. For model inference on a single image, execute commands in the folder yolov5:
python inference.py --data path_to_pretrained_path_yaml_file --img-path path_to_image --save-path path_to_saved_image
--img-path the path to the image.
--save-path the path to draw and save the image with bbox.
--data the path to pretrained model paths yaml file. (Default: data/pretrained_paths_520.yaml)
--conf_thres the score threshold of bounding boxes. (Default: 0.3)
--iou_thres the iou threshold for NMS. (Default: 0.3)
--onnx whether is onnx model inference.
You could find preprocessing and postprocessing processes under the folder exporting/yolov5/.
Evaluation
Evaluation Metric
We will use mean Average Precision (mAP) for evaluation. You can find the script for computing mAP in test.py.
mAP: mAP is the average of Average Precision (AP). AP summarizes a precision-recall curve as the weighted mean of precisions achieved at each threshold, with the increase in recall from the previous threshold used as the weight:
where and
are the precision and recall at the nth threshold. The mAP compares the ground-truth bounding box to the detected box and returns a score. The higher the score, the more accurate the model is in its detections.
Evaluation on a Dataset
For evaluating the trained model on dataset:
python test.py --weights path_to_pth_model_weight --data path_to_data_yaml_file
--weights The path to pretrained model weight. (Defalut: best.pt)
--data The path to data yaml file. (Default: data/coco128.yaml)
--img-size Input shape of the model (Default: (640, 640))
--conf-thres Object confidence threshold. (Default: 0.001)
--device Cuda device, i.e. 0 or 0,1,2,3 or cpu. (Default: cpu)
--verbose Whether report mAP by class.
End-to-End Evaluation
If you would like to perform an end-to-end test with an image dataset, you can use inference_e2e.py under the directory yolov5 to obtain the prediction results.
You have to prepare an initial parameter yaml file for the inference runner. You may check utils/init_params.yaml for the format.
python inference_e2e.py --img-path path_to_dataset_folder --params path_to_init_params_file --save-path path_to_save_json_file
--img-path Path to the dataset directory
--params Path to initial parameter yaml file for the inference runner
--save-path Path to save the prediction to a json file
--gpu GPU id (-1 if cpu) (Default: -1)
The predictions will be saved into a json file that has the following structure:
[
    {'img_path':image_path_1
    'bbox': [[l,t,w,h,score,class_id], [l,t,w,h,score,class_id]]
    },
    {'img_path':image_path_2
    'bbox': [[l,t,w,h,score,class_id], [l,t,w,h,score,class_id]]
    },
    ...
]
Model
| Backbone | Input Size | FPS on 520 | FPS on 720 | Model Size | mAP |
|---|---|---|---|---|---|
| YOLOv5s (no upsample) | 640x640 | 4.91429 | - | 13.1M | 40.4% |
| YOLOv5s (with upsample) | 640x640 | - | 24.4114 | 14.6M | 50.9% |
YOLOv5s (no upsample) is the yolov5s model backbone without upsampling operation, since 520 hardware does not support upsampling operation.